


Testing external dependencies in .NET Core
Use Wiremock to deal with 3rd party API's

It is common nowadays for our systems to use some form of HTTP APIs. The majority of the value of a system comes from its integrations with both internal and external APIs.
There are a couple of caveats here that you need to consider, those API’s:
Might be unreliable
Might have pricing/licensing restrictions
Might have rate limiters, that will make it hard to run a large test suite or one that runs often
….
My favorite approach to dealing with this situation is to set up a Mock API.
Since it is enough to run our tests and have our system call an API that would behave similarly to the one we need.
In our case we are going to call a fictional 3rd Party notification API.

This is where WireMock comes in. It will help us to create in-memory versions of the APIs our application would normally call. These APIs can be configured to respond in specific ways when a request that matches a specific URL, path, header, cookie or body content.
PS: for those new here, we are building things here iteratively with each new newsletter issue, so we will continue with the setup from previous newsletter. You can grab the code at the end of the issue also.
Just like with the MongoDb there are technically 2 ways to run WireMock which we will cover here.
Running WireMock inside a container
In order to run WireMock inside a test container we need to install the WireMock.Net.Testcontainers NuGet package. I’m going to install it in the Integration tests project. Next part is the most interesting we are going to create a set-up similar to the MongoDb one from our Subcutaneous tests. Easier to show:

What we do here is create a wrapper around the WireMock setup. Next we are going to use the WireMockContainerBuilder to set up an instance of the WireMock container that can be managed via the available MappingBuilder client and HTTP Requests.
Inside the SetUpNotificationResponse we are going to specify that we want our Mock API to respond with either a 200 or 400 response to any Post request with the path : /api/v1/notifications. This is a simple PoC setup, WireMock has a bunch of extension methods there to customize even your wildest dreams :)
The cherry on top is the URL part which we can use to re-route traffic to the Mock API by overriding the setting at startup.
Following that we need to update our API factory to include the new instance of the WireMock.

And with that the setup for using WireMock via a test container is done. Before we write any test let’s take a look at how we can do the same via a different approach.
Running WireMock the ‘old’ way
If you don’t fancy test containers for whatever reason, there is an alternative way to set up the WireMock instance. We are going to implement it in the Subcutaneous test project.
In essence it is really similar thought. You first need to install the WireMock.Net NuGet package. Then create a NotificationsAPI just like previously but with the following structure:

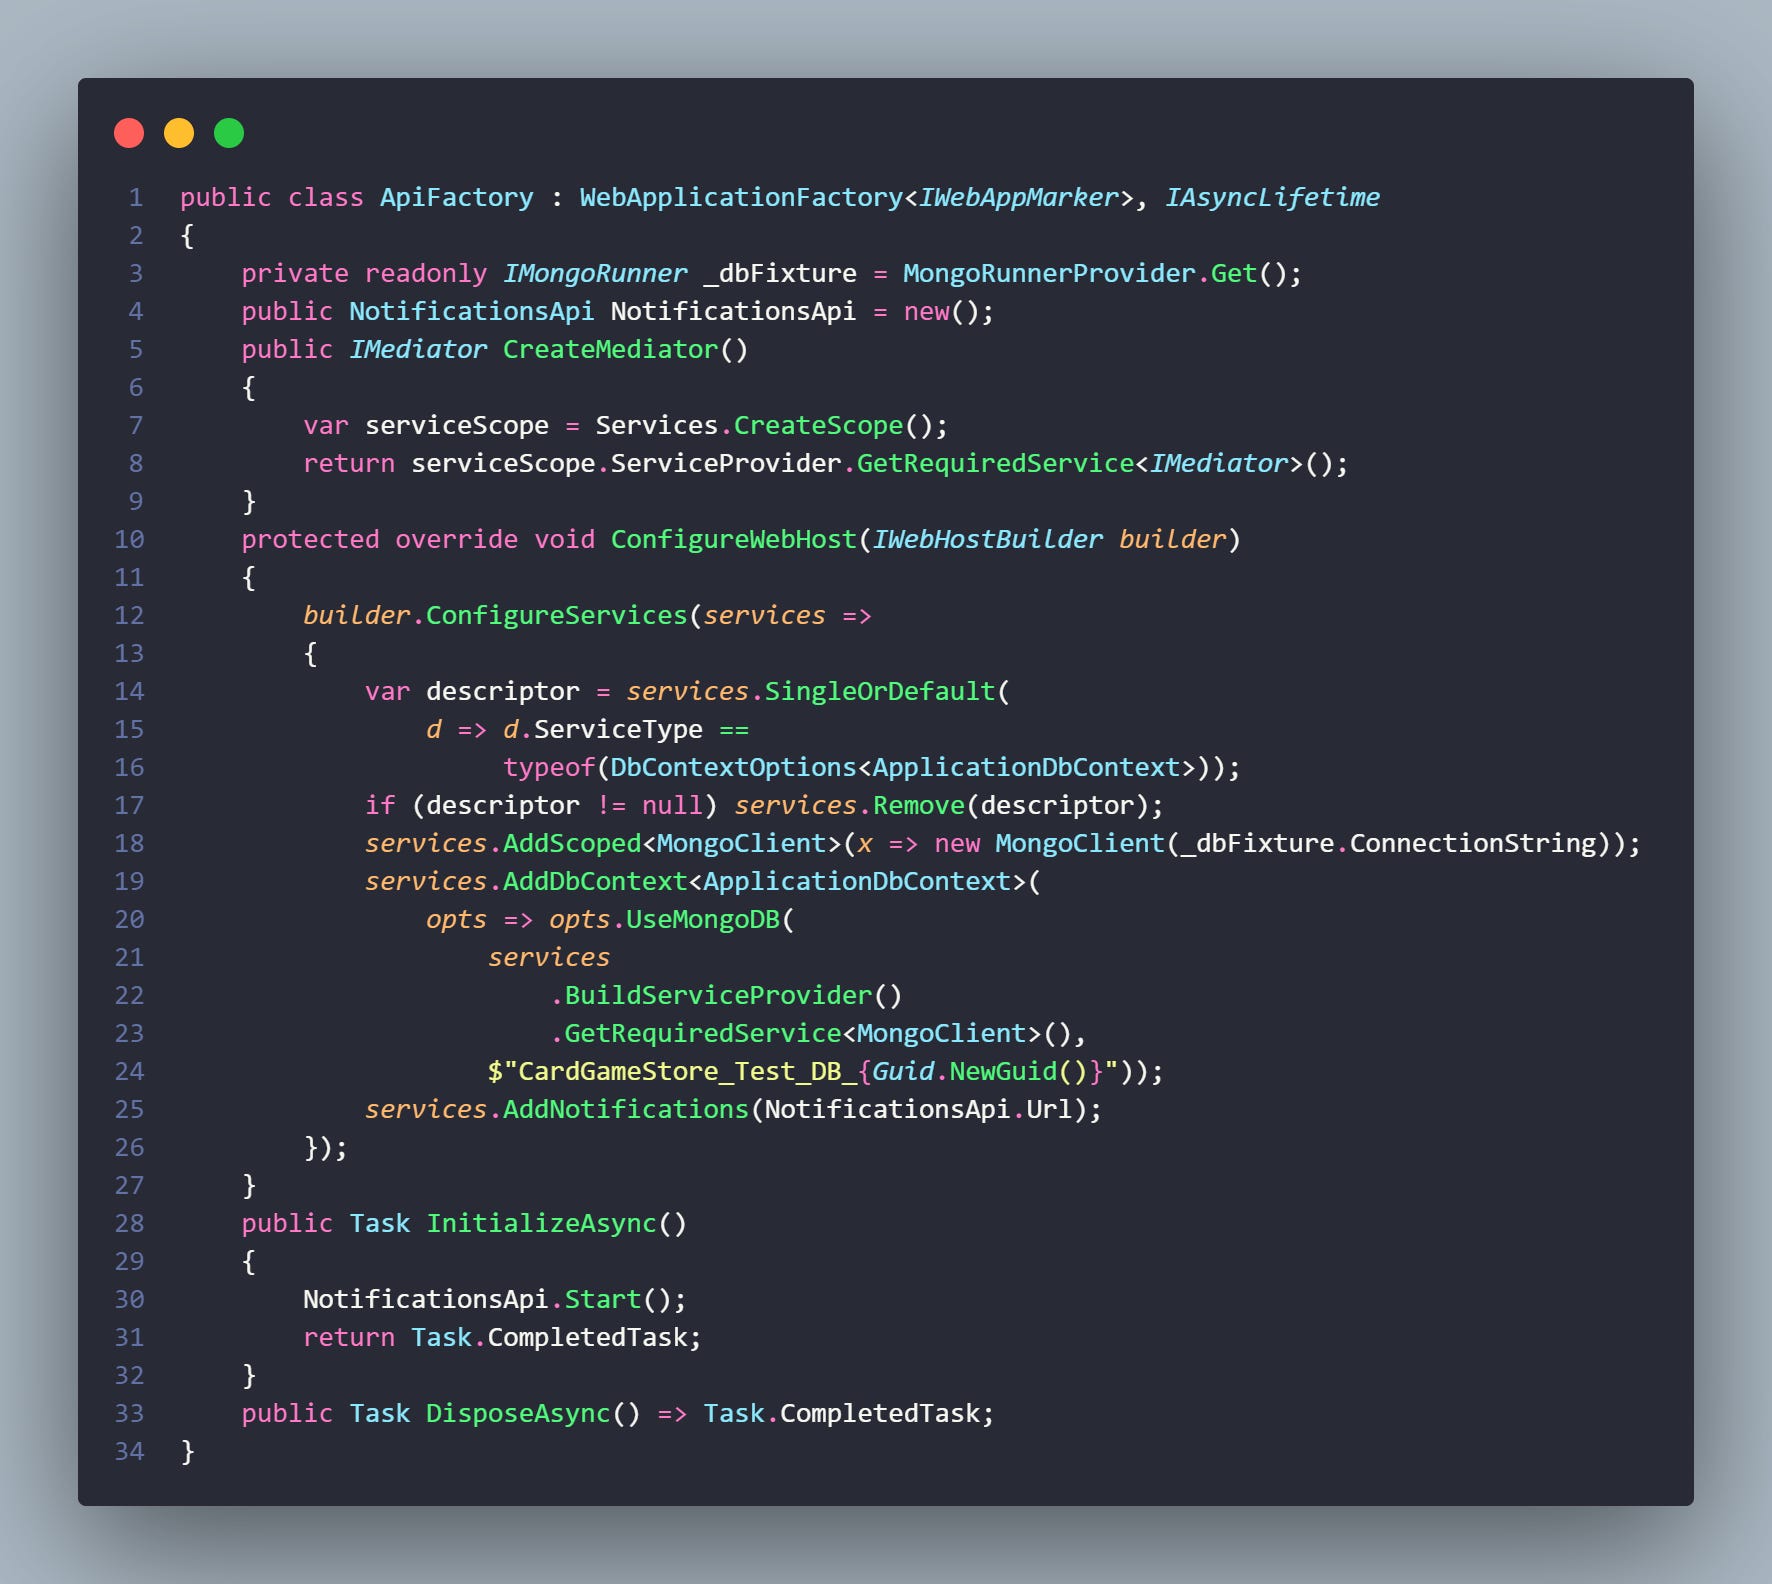
The follow-up step is really similar as in we have to update the ApiFactory to start up the WireMock instance, like this:
With all that in place we can create a set of tests in order to check how our INotificationsService which is just a bare bones typed HTTP client that calls the /api/v1/notifications endpoint with a Post request.

And with that everything is in place for us to pragmatically test our integrations with the 3rd party API.
Noteworthy is the fact that there are other ways to approach this situation like a custom HttpMessageHandler or using Stubs. I personally prefer Wiremock for the following reasons:
When mocking the HTTP request handler, accurately reproducing complex or edge cases that your application may encounter in production can be problematic. Real-world scenarios often include network delays, timeouts, or unexpected responses, which can be challenging to simulate. By not testing against these scenarios, you risk overlooking potential issues that might arise only in specific circumstances.
On the other hand, we have STUBS. One concern with Stubs is that they can become unwieldy when dealing with numerous different scenarios that require testing. Oftentimes, maintaining a large number of Stubs can be burdensome and time-consuming, which is why I avoid that.
If you liked this kind of content/tutorial I will be really grateful if you cloud share it among your colleagues and friends in order to grow the newsletter further.
Heads up:
I just release an entire course around the topic of building a Modular Monolith system that you can find clicking here : Microservices Ready Architecture
Become a Patreon and get access to the source code presented in the newsletters and YouTube channel.
And with that cya next time :-)